Integration Framework Headers with HTTPS Adapter
INTRODUCTION
Various Headers and Exchange Properties are Provided by the Integration Framework that can be utilized while building the integration flow in SAP CPI.
Table Of Content
This article is intended to demonstrate leveraging the Integration Framework Headers associated with HTTPS sender Adapter.
Consider the below URL as an example.
https://abcd.it-cpitrial-rt.cfapps.us10.hana.ondemand.com/http/IF_Headers?q=London,uk&appid=1
The respective Integration Framework headers associated with HTTPS sender Adapter will be as below.
| CamelHttpMethod | Referes to the Method of Incoming request ( GET, POST, DELETE etc ) |
| CamelHttpQuery | Refers to the query string that is contained in the request URL .( q=London,uk&appid=1 ) |
| CamelHttpResponseCode | The response from an HTTP call ( 200 : If successful, 401/404 : If error when used with Exception Subprocess ) |
| CamelHttpUrl | The Request URL without query string. ( https://abcd.it-cpitrial-rt.cfapps.us10.hana.ondemand.com/http/IF_Headers) |
| CamelServletContextPath | The Address given in the channel. ( /IF_Headers ) |
Let’s look a demo to understand how to use these Headers.
I have considered a sample open weather URL to fetch details.
ADDING CERTIFICATE TO THE KEYSTORE
Step 1 : Got to the following URL: https://samples.openweathermap.org/data/2.5/weather?q=London,uk&appid=1 . Click on the Lock icon as shown below.

Step 2 : Click on Certificates (Valid )

Step 3 : Under Details tab, Click on Copy to File.

Step 4 : In the Certificate Export Wizard, Click on Next

Step 5 : In the next window, Choose DER encoded binary X.509 (.CER) radio button. Click on Next.

Step 6 : Browse/Enter a path to save the Certificate and Click on Next.

Step 7 : Click on Finish.

Step 8 : In Overview window, Under Manage Security, Click on Keystore.

Step 9 : Click on Add —> Certificate.

Step 10 : In the Pop up, Give any Alias name of your choice and Browse the certificate that you have already downloaded. Click on Add.

Step 11 : At times you might have to manually Confirm the Certificate. Click on Confirm.

Step 12 : Now you can see that the required certificate is added to the tenant.

CREATING ARTIFACT
Step 13 : Create a simple Artifact as show below.
Sender Adapter will be HTTPS. A request Reply Step to connect with external sample weather URL. Content Modifier to Collect all the above mentioned headers.
An Exception Subprocess is used to handle exception when the HTTP address from Request Reply is not reachable. The Content Modifier inside the Exception Subprocess will serve exactly the same purpose as other Content Modifier used.
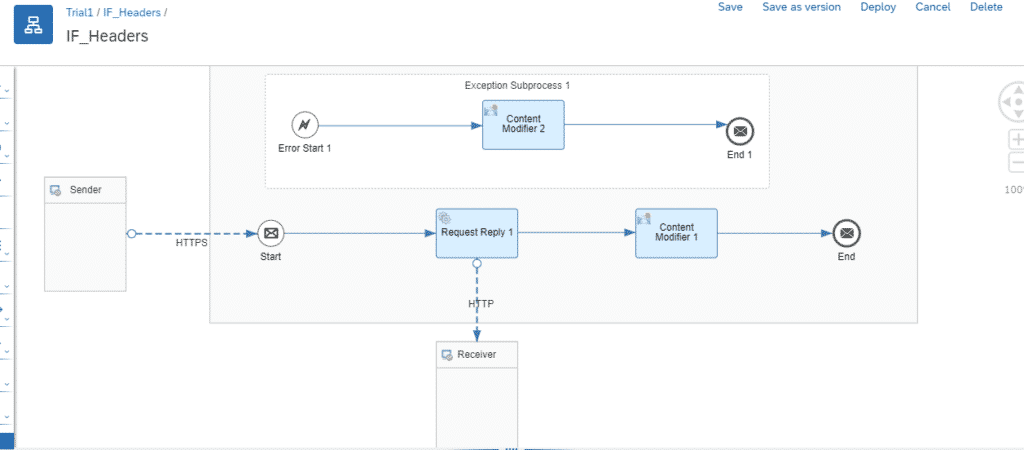
Step 14 : Select the HTTPS Sender Adapter and in Connection tab ,Give Relative address to generate Endpoint for the Flow. ( /IF_Headers ).

Step 15 : Select HTTP Receiver Adapter used with Request Reply Step. In Connection tab,
Address : https://samples.openweathermap.org/data/2.5/weather
Query : ${header.CamelHttpQuery} –> this will take the value from incoming request header.
Method : GET

Step 16 : Select the Content Modifier. In Message Body tab, type as below to capture all the Framework headers.
<Result>

METHOD : ${header.CamelHttpMethod}

QUERY : ${header.CamelHttpQuery}

RESPONSECODE :${header.CamelHttpResponseCode}

URL : ${header.CamelHttpUrl}

CONTEXTPATH : ${header.CamelServletContextPath}

BODY : ${in.body}

</Result> 
Step 17 : Select Content Modifier inside the Exception Subprocess. In Message Body tab, type as below.
<Result1>

METHOD : ${header.CamelHttpMethod}

QUERY : ${header.CamelHttpQuery}

RESPONSECODE :${header.CamelHttpResponseCode}

URL : ${header.CamelHttpUrl}

CONTEXTPATH : ${header.CamelServletContextPath}

BODY : ${in.body}

</Result1> 
Step 18 : Save and Deploy.

Step 19 : Make sure that the Flow is started. Click on the highlighted Copy button under Endpoints to copy the Endpoint.

TESTING THE ARTIFACT
Step 20 : Open Postman app.
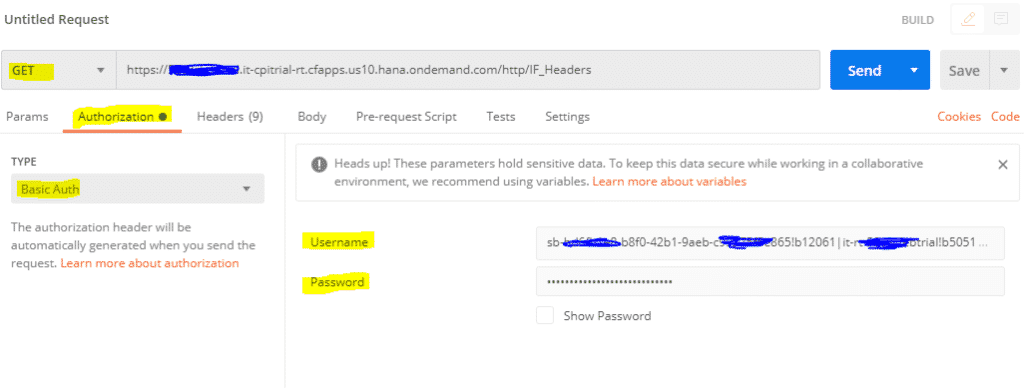
Keep the request in GET mode.
Paste the Endpoint copied in Step 19 in to URL tab.
In Authorization tab, Choose TYPE : Basic Auth
Username : Client ID
Password : Client Secret
Client Id and Client Secret you will get when you create Process Integration Runtime Instance during tenant setup. ( Refer Step 34 of this post )
Step 21 : Under Params tab, insert two Keys and Values corresponding to the query.
| KEY | VALUE |
| q | London,uk |
| appid | 1 |
Now you can observe the endpoint URL automatically changes to accommodate the query parameters in it.

Step 22 : Under Body tab, Choose None radio button as we are not sending any input data to the flow. Click on SEND.

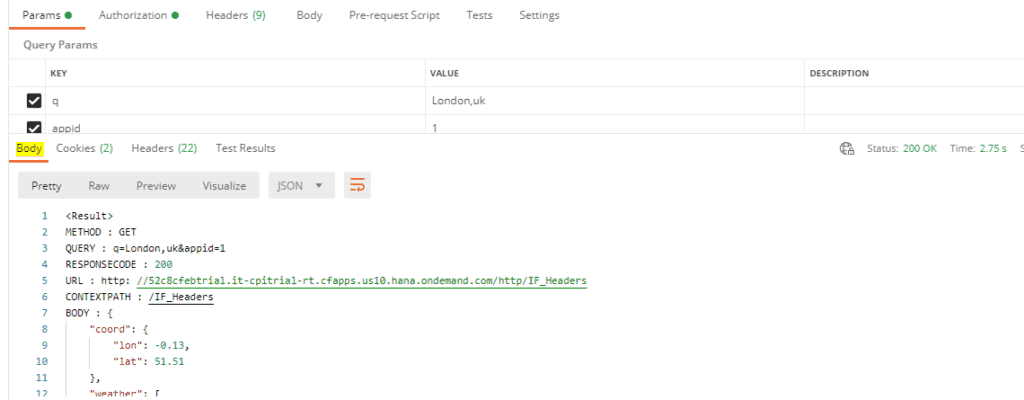
Step 23 : You will get back the following response. Verify whether you are getting values as explained in the introduction.
Note that the RESPONSE CODE is 200 which means the URL was reached Successfully. And the Information returned from the URL is Displayed under BODY.
Step 24 : Go back to the Artifact. Click on HTTP Receiver adapter connected from Request Reply to the Receiver. In Connection tab, Change the address to https://samples.openweathermap.org/data/2.5/wea so that the end point is incomplete , not reachable and the flow throws exception.

Step 25 : Save and Deploy.

Step 26 : Make sure that the Flow is started again.

Step 27 : Go back to POSTMAN. The previous settings will still be available. Click on SEND.

Step 28 : You will get the below response.
Note that the RESPONSE CODE now is 404 which indicates that the URL is not reachable and so the BODY will be blank as nothing is returned from the fault URL.

You can further decide where to route the message based on Response code as per your needs.
FINAL VERDICT :
In conclusion, I hope you enjoyed reading this article on “Integration Framework Headers with HTTPS Adapter”, If yes, then don’t forget to spread a word about it. Do send the feedback and to know more about it. Signing off sudarshan@recodehive.com


